
Why this isn’t just another mesh job
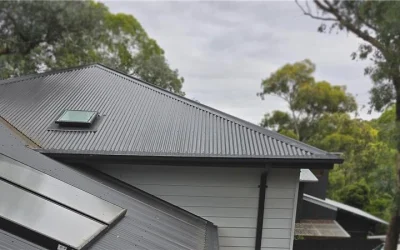
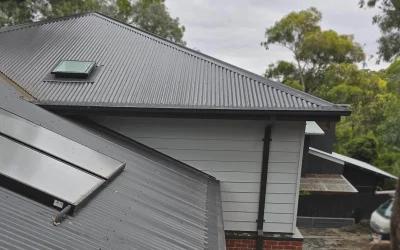
Colorbond® is tough, coated steel—brilliant for Aussie weather—but it demands compatible fasteners and sealants. The “secret sauce” behind a clean, long-lasting Colorbond gutter guard installation is a tidy interface: mesh that sits flush, saddles aligned to your specific profile (corrugated, Trimdek®, Klip-Lok®, etc.), gutter-edge trim in matched colours, and fasteners with EPDM sealing washers set to the right tension. Get those wrong and you’ll invite staining, corrosion, or leaks; get them right and you’ll barely think about your gutters for years.
Who is this for?
- Homeowners upgrading to aluminium gutter mesh in Colorbond® colours.
- Renovators wanting gutter mesh for corrugated roofs or Klip-Lok® saddles done right.
- Anyone comparing professional install vs DIY and wanting current, Australia-specific best practice.
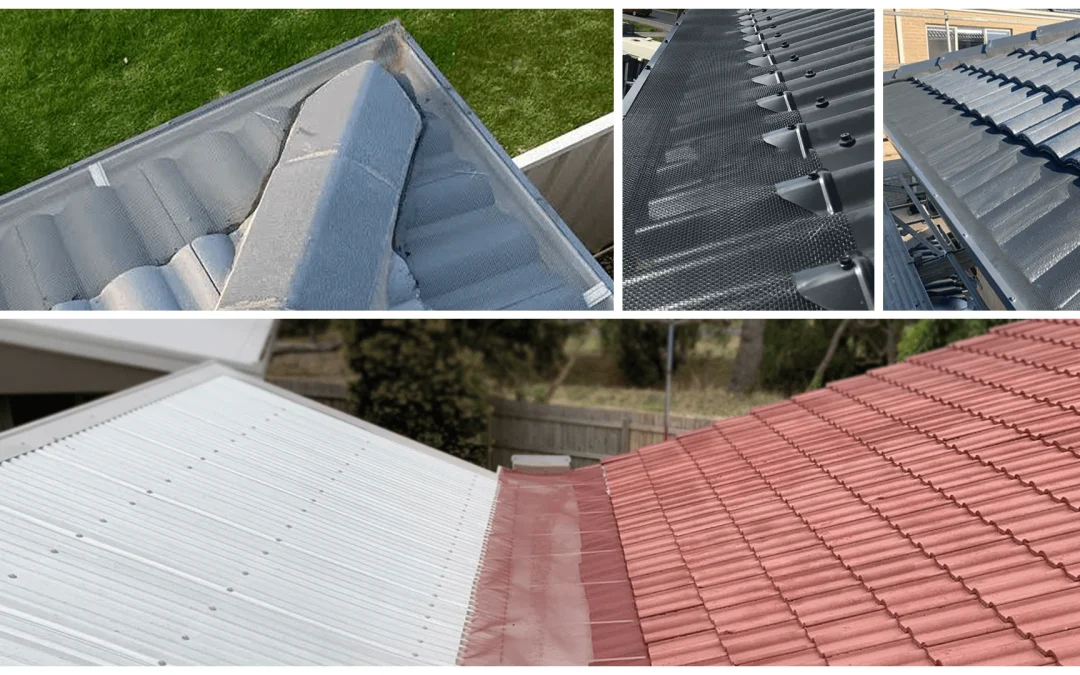
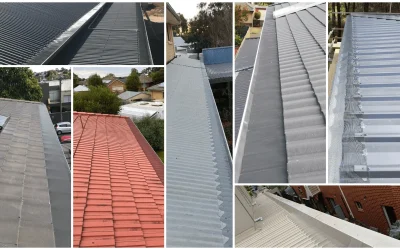
Meet the essentials: mesh, saddles, trim, and sealant
Mesh: Choose quality aluminium gutter guard mesh that’s compatible with your roof profile and local risks (leaves, pests, wind-borne litter; in some areas, ember guard mesh with a fine aperture). Aluminium is the standard because it’s light, strong, and available in Colorbond® tones. If you’re in a bushfire-prone location, look to ember guard gutter mesh products with documented aperture and BAL suitability.
Saddles (clips): The mesh fixes to the roof using profile-specific gutter guard saddles—corrugated, Trimdek®, or Klip-Lok saddles. The clip form matters: it sets mesh tension and prevents sags or gaps. For concealed-fix profiles like Klip-Lok®, use purpose-made Klip-Lok® saddles rather than improvising.
Trim: At the gutter edge, colour-matched gutter guard trim is screwed through the mesh into the gutter lip. A straight, uniform trim line is what makes the project look “factory.”
Sealant: Only neutral-cure silicone is recommended with Colorbond® and ZINCALUME® finishes. Acid-cure sealants can attack the coating and are a hard “no.” When you do need a bead—at terminations, tricky corners, or where accessories meet coated steel—reach for neutral-cure, and clean off excess.
Fasteners & washers: Use roofing screws compliant with AS 3566 and EPDM sealing washers (not neoprene) on Colorbond® finishes. Tighten until the washer just compresses—no “crushing” the sheet or splitting the washer.
CPR Gutter Protection: what they actually do
If you’re looking for a professional in Victoria, CPR Gutter Protection focuses on gutter guard solutions including Colorbond gutter guard, gutter screens, and aluminium mesh gutter guard. They highlight free measure and quote, and note they’re 100% Australian-owned with service across Melbourne and surrounding Victorian areas; they also talk about a complimentary clean with purchase. Keep in mind their footprint is Victoria-centric, so if you’re outside that area, always confirm service coverage.
Best-practice sequence for Colorbond® roofs
Below is a field-tested flow that reflects Australian installation guidance for metal roofs—specifically corrugated/Trimdek® and Klip-Lok® types—so your Installing the best Gutter Guard Mesh in Australia project lands tidy and durable.
1) Preparation and safety
- Clear the gutters and valleys fully. Rinse out fines so trims and screws sit clean.
- Inspect for loose fixings, rust spots, or damaged sections; remedy before adding mesh.
- Work off a stable ladder or scaffold with fall protection on higher pitches.
- Check the roof profile and gather the correct saddles, trim, AS 3566 screws, and EPDM washers.
2) Pre-fit the mesh and trim line
- Roll the aluminium gutter mesh along the gutter run and square it to the eaves.
- Offer up your gutter guard trim to confirm a straight visual line; lightly clamp if needed.
- At corners and stop ends, plan overlaps so water flows over, not under, any joint.
3) Fix the gutter edge
- Fix the gutter guard trim through the mesh into the gutter lip using hex-head roofing screws.
- Keep the trim snug but not bowed; consistency here dictates the final look.
4) Set mesh tension on the roof sheet
- Corrugated/Trimdek®: place gutter guard saddles over every second corrugation as a rule of thumb (adjust for wind zones and manufacturer guidance).
- Klip-Lok® saddles: align to rib centres for a flush, ripple-free finish.
- Drive screws with a steady hand—tight enough to seal, not enough to distort.
5) Valleys and tricky transitions
- For valleys, cut mesh strips to suit the pan width, lay from ridge towards eaves, and use saddles at each rib to keep a clean fall line.
- Where valley mesh meets the gutter mesh, lap the valley piece over the gutter run so shed material travels downhill.
6) Sealant and finishing
- Use neutral-cure silicone only where needed (end trims, mitres, and accessory junctions).
- Wipe off excess immediately; sealants should support mechanical fixings, not replace them.
7) Final checks
- Hose-test select sections to confirm flow and no capillary paths into laps.
- Confirm mesh tension, saddle spacing, and that EPDM washers are evenly compressed.
Short checklist you can take to the roof
- Installing the best Gutter Guard Mesh in Australia starts with profile-correct saddles and colour-matched trim.
- Use aluminium gutter guard mesh matched to Colorbond® colours.
- Fix with AS 3566 screws and EPDM sealing washers; tighten to “just compressed.”
- Seal only with neutral-cure silicone; never acid-cure.
- For Klip-Lok® saddles, align precisely to ribs; for corrugated, aim for every second corrugation.
- Treat valleys as a separate detail; lap valley mesh over gutter runs.
DIY vs professional install—how to decide
DIY can work if you’re comfortable on roofs and can identify your profile correctly (corrugated vs Trimdek® vs Klip-Lok®), cut mesh accurately, and keep mesh tension even. Kits often include the right saddles, trim, fasteners, and step-by-step guides or videos.
Professional install is worth it when you’ve got complex roof breaks, steep pitches, multiple profiles meeting at odd angles, or you want a warrantable finish in Colorbond® colours. If you’re in Victoria, you can talk to CPR Gutter Protection about options and an on-site measure.
Common mistakes (and how to dodge them)
- Using the wrong sealant: Anything but neutral-cure silicone risks attacking the Colorbond® coating.
- Over-tightening screws: Splits washers, dimples sheets, and creates leak paths. Aim for “just compressed” EPDM.
- Random saddle spacing: Leads to sags and leaf traps. Follow profile-specific spacing—e.g., every second corrugation for many corrugated installs.
- Skipping valley treatment: Valleys are debris highways; install dedicated gutter guard for valleys and lap correctly.
- Mismatched trim colour/line: A wavy trim line ruins the façade. Dry-fit, mark, then fix.
A practical, Victoria-focused example
Let’s say you’ve got a corrugated Colorbond® roof in the eastern suburbs of Melbourne with stringybarks nearby. A sound spec might read like this:
- aluminium gutter guard mesh in a Colorbond®-matched colour, aperture selected for local leaf size (and ember guard mesh if you’re in a mapped risk area).
- Corrugated gutter guard saddles every second corrugation, stainless or Class-4 coated AS 3566 roofing screws with EPDM sealing washers.
- Straight, colour-matched gutter guard trim along the gutter edge.
- neutral-cure silicone at mitres and terminations only, wiped neat.
- Valley mesh lapped over the gutter runs.
If you’d prefer a done-for-you route with a local team, speak with CPR Gutter Protection about their Colorbond gutter guard options and on-site measure in Victoria.
Quick buying and quoting tips
- Ask for confirmation that fasteners meet AS 3566 and use EPDM sealing washers.
- Confirm the mesh aperture and whether you need ember guard mesh.
- Specify your roof profile so the quote includes the correct Klip-Lok saddles or corrugated/Trimdek® clips.
- Ensure gutter guard trim is included and colour matched.
- Confirm use of neutral-cure silicone only on Colorbond® surfaces.
Final word
A great Colorbond gutter guard installation is an exercise in detail. Choose quality aluminium gutter guard mesh, lock it down with the right gutter guard saddles, finish with straight, colour-matched gutter guard trim, and only ever seal with neutral-cure silicone compatible with Colorbond®. Whether you DIY with a reputable kit or bring in a pro like a Victorian specialist such as CPR Gutter Protection, those best-practice fundamentals are what keep water moving and debris out—quietly, year after year.
FAQs
1. What does Installing the best Gutter Guard Mesh in Australia actually involve on a Colorbond® roof?
2. Why does every guide keep saying “neutral-cure” silicone?
3. Do I need special clips or saddles for Klip-Lok® sheets?
4. Which mesh aperture is best—and what about ember guard requirements?
5. What fasteners should be used on Colorbond® when fitting mesh and trim?
Social Share:
Related Posts
Gutter Protection for Box Gutters & Valleys: When to Use Valley Mesh
If your roof has box gutters and roof valleys, you already know they’re workhorses…
Gutter Protection in Coastal Zones: Beating Salt Spray and Corrosion
Your roof and gutters feel it too. Salt spray, wind and fine sand work together. Corrosion…
Gutter Protection Systems: Save Money & Prevent Home Damage
You glance out the window and notice your gutters overflowing, water spilling over the edges…